Installing "xming.exe"
"xming.exe" is a free and open-source Windows application. Use
download xming
to download "xming.exe" from ses.hoyo.zeetix.com.
Save the downloaded installer, and then run Xming-6-9-0-31-setup.exe from
whereever it has been saved.
Unless otherwise specified, it will be installed in C:\Program Files (x86)\Xming.
Running "xming.exe"
Once installed, "xming" is run in the usual way from either a shortcut or from the start screen.
Configuring "PuTTY" to use "GATE Developer"
The following steps describe how to configure a saved PuTTY session so
"GATE Developer" can be run on a Windows desktop. These steps are done in
the "PuTTY configuration" window that opens when PuTTY is launched.
-
Top-level session configuration
A
PuTTYsaved session is the most convenient way to run "GATE Developer" usingPuTTYandxming. This step describes how to load or save a saved session using the top level ofPuTTYconfiguration screen.- The top-level settings page is titled "Basic options for your PuTTY session"
- The desired session should be selected from "Saved Sessions" and loaded using the "Load" button. If a new session is created, enter its name in the entry box just above the "Saved Sessions" list and click the "Save" button.
- The "Host Name" field must contain "hoyo.zeetix.com" (without an quotes).
- The "Connection type" should be set to "SSH"
These settings are emphasized in the "Figure 1" below.
NOTE: If any changes are needed, be sure to click the "Save" button alongside the "Saved Sessions" list after making the changes.
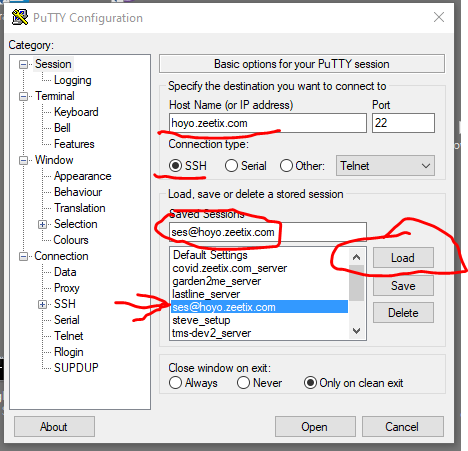
Figure 1: Configure PuTTY session
-
Configure the "Data" setting
The next step is to configure the "Data" subsection of the "Connection" section of the left-hand navigation pane.
- Select "Connection" and then "Data" in the left-hand navigation pane.
- This settings page is titled "Data to send to the server"
- Enter "ses" (without quotes) into the "Auto-login username" field.
- Confirm that the other settings are as shown in Figure 2, below.
These changes are highlighted in Figure 2, below.
NOTE: If any changes are needed, be sure to click the "Save" button alongside the "Saved Sessions" list of the top-level session configuration page after completing the needed changes.
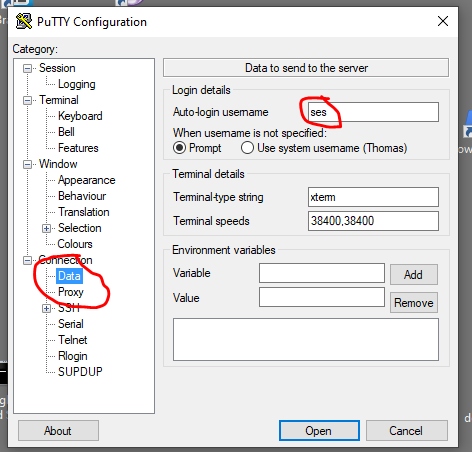
Figure 2: Configure Data section
-
Configure the "Xll" setting
The third and final step is to configure the "Connection->SSH->X11" subsection of left-hand navigation pane.
- Select "Connection", then "SSH", and then "X11" in the left-hand navigation pane.
- This settings page is titled "Options controlling SSH X11 forwarding"
- If needed, click on the "Enable X11 forwarding" checkbox. It contains a check mark while enabled.
- If needed, select the "MIT-Magic-Cookie-1" radio button. It contains a black dot while selected
These changes are highlighted in Figure 3, below.
NOTE: If any changes are needed, be sure to click the "Save" button alongside the "Saved Sessions" list of the top-level session configuration page after completing the needed changes.
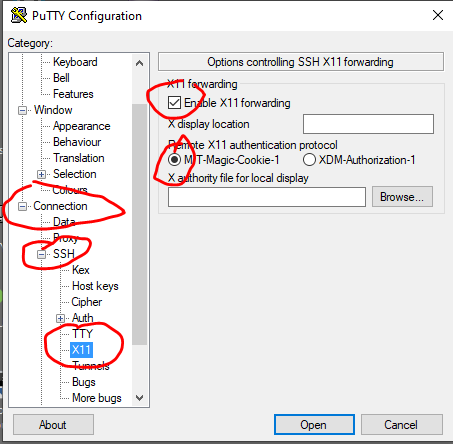
Figure 3: Configure X11 section
Running "GATE Developer"
"GATE Developer" is opened and run from a command line inside a running
PuTTY session. An alias in the 'ses' user account allows "GATE Developer"
to be run using a single command ("gateDeveloper") from the command line.
This requires that xming be installed and running (see above). It must be
run from a PuTTY session configured to use X11 forwarding (see above).
The following steps show the sequence of running and then closing "GATE Developer"
-
Start a
PuTTYsessionLoad and run the saved
PuTTYsession configured earlierFigure 4 shows the resulting open
PuTTYsession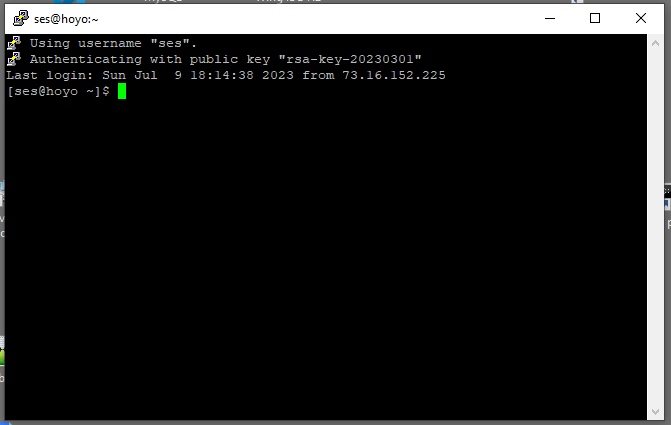
Figure 4: Initial PuTTY session
-
Run the
gateDevelopercommandEnter "gateDeveloper" (without quotes) at the command line.
Figure 5 shows the command (highlighted) and the resulting status information that appears as "GATE Developer" is started.

Figure 5: Run the gateDeveloper command
-
The "GATE Developer" splash screen appears
Assuming that
xmingis running, the "GATE Developer" splash screen opens on the Windows desktop.
Figure 6: Splash screen
-
"GATE Developer" opens
After "GATE Developer" has finished initializing, the splash screen is replaced by the initial "GATE Developer" window.
The user guide for "GATE Developer" is Chapter 3 of GATE Developer user documentation.
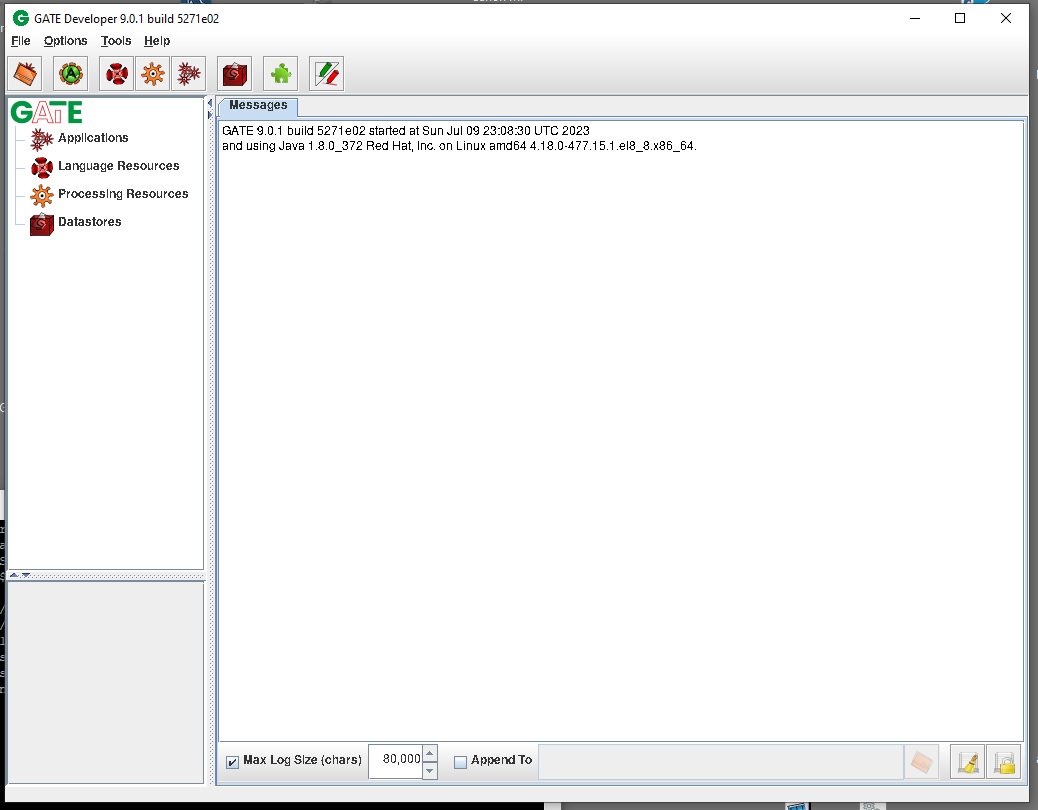
Figure 7: Initial GATE Developer
-
Close "GATE Developer"
The "GATE Developer" application is closed by clicking the "Close" button at the top right of the application (a red "X").
After the "GATE Developer" application is closed, the still-open
PuTTYsession has returned to the normal command prompt.The "GATE Developer" application can be restarted by repeating step 2 above.
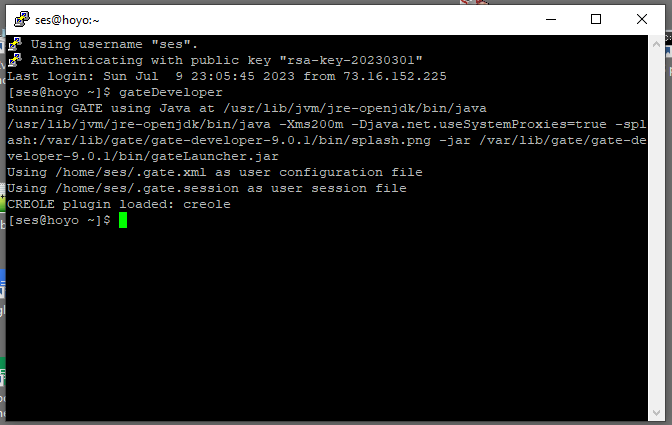
Figure 7: PuTTY session after closing